Bind Image In Datalist Control In Asp.net c#
Introduction :-
I have used the dataList asp control to display images and images are stored in application directory .
I have written the html code as well as the code behind code to bind the images in datakist control in c# .
The itemTemplate of dataList is used to display images of product .
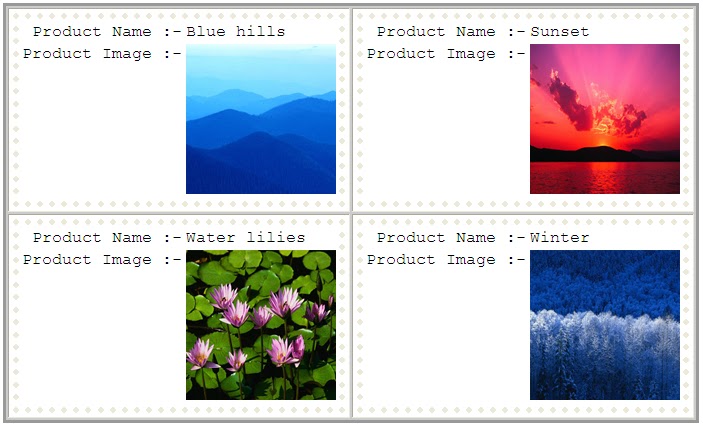
Display of Images :-
HTML Code of Datalist :-
c# Code for Bind Image Datalist :
I hope this article will help You .
Introduction :-
I have used the dataList asp control to display images and images are stored in application directory .
I have written the html code as well as the code behind code to bind the images in datakist control in c# .
The itemTemplate of dataList is used to display images of product .
Display of Images :-
HTML Code of Datalist :-
<asp:DataList ID="dlImages" runat="server" RepeatDirection="Horizontal" RepeatColumns="2" BackColor="#CCCCCC" BorderColor="#999999" BorderStyle="Solid" BorderWidth="3px"
CellPadding="4" CellSpacing="2" ForeColor="Black" GridLines="Both">
<FooterStyle BackColor="#CCCCCC" />
<ItemTemplate>
    <table  style="font-family:Courier New;border-style:dotted;border-width:thick" >
        <tr>
            <td align="right">Product Name :-</td>
            <td><asp:Label ID="lblName" Text='<%# Eval("Name") %>' runat="server"></asp:Label></td>
        </tr>
        <tr>
            <td valign="top">Product Image :-</td>
            <td><asp:Image ID="imageProduct" Width="150" Height="150" ImageUrl='<%# Eval("ImagePath") %>' runat="server" /></td>
        </tr>
    </table>
</ItemTemplate>
<ItemStyle BackColor="White" />
<SeparatorStyle Font-Bold="False" Font-Italic="False" Font-Overline="False" Font-Strikeout="False"
    Font-Underline="False" />
<SelectedItemStyle BackColor="#000099" Font-Bold="True" ForeColor="White" />
<HeaderStyle BackColor="Black" Font-Bold="True" ForeColor="White" />
</asp:DataList>
c# Code for Bind Image Datalist :
protected void Page_Load(object sender, EventArgs e) {if (!IsPostBack) { dlImages.DataSource = DataBindInDataLIST(); dlImages.DataBind(); } } public DataTable DataBindInDataLIST() { //--Decalration Of Data Table ---// DataTable Dt = new DataTable(); //--Decalration Of Data Column-----// DataColumn DCID = new DataColumn("Name", typeof(String)); DataColumn DCName = new DataColumn("ImagePath", typeof(String)); //-- Add Data Column to DataTable --// Dt.Columns.Add(DCID); Dt.Columns.Add(DCName); //-- Add Data Rows to DataTable --// DataRow Dr1 = Dt.NewRow(); Dr1["ImagePath"] = "~\\ProductImage\\Blue hills.jpg"; Dr1["Name"] = "Blue hills"; DataRow Dr2 = Dt.NewRow(); Dr2["ImagePath"] = "ProductImage\\Sunset.jpg"; Dr2["Name"] = "Sunset"; DataRow Dr3 = Dt.NewRow(); Dr3["ImagePath"] = "ProductImage\\Water lilies.jpg"; Dr3["Name"] = "Water lilies"; DataRow Dr4 = Dt.NewRow(); Dr4["ImagePath"] = "ProductImage\\Winter.jpg"; Dr4["Name"] = "Winter"; Dt.Rows.Add(Dr1); Dt.Rows.Add(Dr2); Dt.Rows.Add(Dr3); Dt.Rows.Add(Dr4); return Dt; }
I hope this article will help You .